Thursday, 26 November 2009

Boing!

A mobile vehicle was an attractive prospect, so the front cross member was the first bit of spannering. Even that needed some dodgy old arc welding removing, and a repair section welded in. I swear this car must have spent several years submerged, for the front crossmember to require serious welding repairs in three different areas. Anyway it was fine now so I attacked it with a twisted cup brush in the grinder until it was shiny.

I had a methodical stage, and found every single component on the car which needed painting black, readied everything for paint and derusted it all at once, then painted it all black in one go. Several coats of Tetrosyl Black Chassis Paint should provide the best possible protection, this paint takes a long time to completely harden (a few weeks really, but it dries quick enough to handle and assemble in the same time as most paints do) but once it is dry, it is incredibly strong and impact-resistant. It is superbly glossy as well, and looks great when dry. It is a bit prone to running though, so care is needed. It brushes on very well, and does not leave brush marks. It can also be sprayed, I did this on a couple of things and it worked equally well.


Loverly glossy Tetrosyl black chassis paint. Hard to find, but well worth it! All metal which needs to be black was painted with this. The resiliance of this stuff outweighs the fact that some things should be satin or matt black, not gloss.


I now had a complete kit of parts to make the front suspension, along with the reconditioned uprated dampers, the new uprated springs and the dark blue polybushes. Many new nuts and bolts, the top fulcrum pins, dust excluders for the lower pivot, and new bump stops. The stub axle assemblies were reused, as the kingpins were replaced shortly before the rebuild started. The photos tell the story of the assembly.


Ahhhh life could not be better! A complete kit of clean, painted, and new parts for assembly. Add a large amount of copper grease into the equation and it's time to get spannering (Of which I have done none for months, just metal mashing and painting).


All the stuff for one side. Dark blue polybushes were chosen as they are subtle, should last a lot longer, are easier to remove, and will hopefully keep the suspension geometry near where it is intended. Nice Stainless crush tubes, too.


Lots on nice new high tensile bolts ready to be torqued up. The old bump stops were wrecked, one was missing and the other one a corroded mess. The trouble is the alloy spacer and the steel... I made up gaskets to go between them, which might help. The bolts will still conduct though, so it might not.


Fitting polybushes to the wishbone arms. First step, put one in each side. Easy, then add the correct grease to the cross hatching inside. The difficult bit is pressing in the stainless crush tube....


I got a bit more leverage using a socket which was a tight fit inside the crush tube, and an extension for more force!


Shove thee in, with some more grease....


Place it in a vice! Or G clamp, with a couple of large washers or similar either side.


Woot. There you go.


Building up the wishbone arms and pan. Note the epic amounts of copper grease, essential. All photos of the underside of the car show it filthy and covered in copper grease and hand prints. Don't worry, these were cleaned off but at the very end!


Back inside because the rain came! Oh well, it stayed dry and hot all the while I was spraying the car, so I can't complain really. I was very lucky with that. Here the dampers are being bolted on.


The stub axles were fitted at the bottom pivot, and the polybushes fitted into the top pivot. The crossmember was then transferred to the floor, and the springs put into place. Using a combination of thick rope, leverage, strength and cunning, the springs were compressed enough to get the top fulcrum pin in.


The whole assembly was bolted up to my beautiful new chassis rails, using polybush crossmember mounting pads to limit the movement of the crossmember. The steering arms were fitted and torqued, and the new track rod ends were fitted to the steering rack, which had also been fitted with new gaitors. The rack was loosely bolted into place, its final position to be determined by the steering column. With the brake disc stone guards fitted, the new hubs were fitted with new wheel bearings and shimmed to give the correct end float.
That's the front end done then!


Rally Valli

Due to her competition history, I think it would be flipping rude not to get her back out taking on other inferior motor vehicles. So I am rebuilding her for road and Historic Endurance rallying. No huge changes really, and nothing which cannot be undone or removed easily, as I am fed up with the amount of hacked around classics which have been modified for the sake of being modified.

So the alterations are subtle, based on ironing out any chances of breakdown or failure, based on common vehicle breakdown causes, research into MGB weak areas both in normal use and in competition, and making the car slightly more responsive and giving it the ability to use rough roads without problems.

All of which had to be done in such a was as to:

-Make no alterations to the standard vehicle which could not quickly and easily be undone or removed, so I could return her to dead standard in a few hours.

-Make the overall appearance and design of the car, and any extras, look like a period amateur rally car of the day. So only additions which could have, and would have, been made and fitted to an MGB owner in his workshop to give his car a better chance at rallying. Using materials, equipment and methods of the early 1970s and before.

-Still be useable every day. That involves driving everywhere, town use, a lot of night driving and speed bumps. No alterations could compromise the usability of the car on the road.

-Protect the car from sustaining damage which would render it unusable. Most clubman’s rally cars we used daily, like mine. Taking the exhaust off on a rock, then not being able to drive the next day is not a good situation.

-Make the car legal and eligible for use in rallying. Anything which contravenes regulations would need to be removable or attachable quickly and easily.

So a big list was made, items were considered, debated upon, researched and decided upon. The current list of rallying tweaks, which either have been or will be undertaken, are below.

-Strengthened and seam welded body shell, with adequate protection for wet, muddy and rough road use… this is what I have been making so far! As well as spot welds in the original places, much seam welding has been done in the areas required to give the bodyshell more strength without affecting the corner-to-corner flexibility required for good handling on bad roads. The underside is more than adequately protected, and as the topside is painted in cellulose, stone chips and hedge scratches can be easily repaired.

-Driving lamps fitted to the front, with fog and spot lenses. An additional auxiliary wiring loom will supply power, and a bolt on alloy plate in the engine bay will hold the relays and fusebox for the lamps.

-Higher powered reversing lamps, utilising the original mounting holes.
-SU double ended fuel pumps- two of these will be fitted, with each pump being individually switched.

-Wiring loom to has all connections soldered, all lengths of loom at risk of abrasion damage will be reinforced. Sidelight clusters will have separate earths, and dipped and main beam headlamps will be wired through relays.

-Potti map magnifier fitted

-Fire extinguishers

-Navigator’s footrest

-All other navigational equipment and aux switching will be mounted on an alloy panel on the dashboard. This will hold the map reading lamp, stopclocks and their lights, pacenote lamps, trip computer, and switching for aux lamps, fuel pumps, navigational equipment and the navigator’s horn button.
-Accelerator pedal extension for the old heel and toe

-Leather bonnet straps to keep bonnet on

-Copper brake pipes, for corrosion resistance

-Battery cut-out switch mounted within reach of driver

-Single 12v high capacity battery, in one of the original battery boxes-Exhaust system mounted higher to reduce risk of damage.

-Decent heat reflecting material applied to underside of heat shield, to prevent fuel vaporisation-Fuel filter & pressure regulator, to tame the SU double-banger pumps, and filter out the fuel efficiently.

-Spare coil mounted above first

-In addition, a spare distributor will always be carried, rebuild and working, in case of any ignition problem it can be fitted in minutes far more easily than points or condenser.

-Sump guard

-Higher output alternator

-Waterproofed distributor, and all grommets and holes into the bodyshell sealed effectively.

-Intake manifold core plugs fitted with straps to prevent them coming adrift.

-Polyurethane suspension bushes, the closest colour to black as possible.

-Uprated dampers

-Slightly stiffer front springs

-Possibly a thicker anti-roll bar


So there we go, all this needs to be incorporated. It will hopefully be a capable and reliable machine once finished…

Liquivalli

Immediately after putting a coat of paint on, I made a habit of scurrying out for some fresh air. Then once the paint had dried sufficiently, it was time to start the long process of sanding it flat, ready for the next coat. This was made a lot quicker and easier by getting a good finish from the gun in the first place, with no orange peel or runs (admittedly there were a couple to deal with over the 9 or so coats, both occurred right at the very end of the spraying session when I was loosing judgement fast).

Still, the sanding process was important, and a perfectly smooth surface was required ready for the next layer of paint. 800 grit was used for all but the gloss coats, and this was used on a rubber sanding block for large flat areas, and by hand on delicate bits and edges where the risk of sanding through was high. Lots of water and soap (not washing up liquid, that is full of salt) and just a case of getting down to it! The panel area is quite large, and it takes many hours to complete the car. Fairport Convention in the tune machine, and rock away into the early hours, to be ready for the next coat a few hours later! With all smooth, all traces of soap were removed, the compressor and filters were drained, and all ready to repeat the process again! The overspray and sanding dust was not a problem, as long as the walls and floor were dampened it stay put.
This was repeated for the five coats of high build primer. All was well, the only point worth noting is the care required so as not to sand back too far on corners or edges.
High build primering in process... the interior is all sheeted off, and the sunroof frame has been masked with paper.
Another hazard when sanding these areas by hand, is not to sand through your fingers. You don’t notice it until too late, then it hurts. Oh well, wrap fingers in duct tape and carry on.
Any tiny flaws in the paint finish were filled in using paint stopper then sanded back, to give a flat uniform finish. Once the five coats of high build were on and flatted, she was really beginning to look the part. The last of these grey coats was sanded with 1200 grade wet and dry, and all was ready for the gloss.

Looking good at the back... light apatures have been masked off to stop overspray getting in, then getting blown out all oven the place once dry.


Ahh, note the cunning plan to allow the scuttle to be painted right up to the edge, while still having the wing in vaguely the right position...


All Bondaprimered inside, and grey outside.

Glacier white, mmm nice. It’s actually very light green! All whites are off white, but I hadn’t realised just how greeny Glacier white is until I poured it through the filters. These are white paper, the paint looked worryingly green! Very careful preparation was necessary, and mixing the paint with the high gloss thinners had to be done precisely, taking into account the air temperature which makes a big difference to how the drops atomise and dry as they travel through the air, let alone how they build and amalgamate on the panel.

Logic time. The engine bay and boot area would be painted white first, then onto the outer panels. That way I could get used to the thinned out gloss, quite a difference after the user-friendly high build primer. These areas of the car had been painted in red Bondaprimer, any imperfections were sanded out and the gloss was just blown over the top. I was not too concerned about getting it perfect, after all they are not often seen, however two coats of gloss and the engine bay and boot were looking rather smashing.

The boot area, engine bay and door frame/top of sill after the first coat of white. At the same time, the doors were being painted around the edges.
With the bonnet replaced, I moved on to the outer panels. As soon as the first coat of white was finished, she was starting to come to life again, after all this time as bare steel and primer. The gloss coats were flatted in the same way as the primer, only this time using 1200 grade wet and dry until the early hours. Five coats of white were completed, and I was happy to leave it at that.

Most of the interior was left in primer. A waste of expensive paint, that would not have been seen anyway.


Chrome bumper wings! You couldn't tell any different.


All looking rather good now.


Have a look at the reflections in the bonnet... this was straight from the gun, after the paint had dried and the fumes left the garage.

Cutting and polishing then began in some areas, but as reassembly commenced, there was less time for this and it happened as time allowed (often late at night, when noisy jobs were antisocial). Farecla cutting compound was used, by hand with a damp cloth. And a lot of effort. It did a splendid job though, the depth of the gloss was impressive and the paintwork looked liquid.
The wings and bonnet were then removed, and put into storage for later.

Because now at last, it’s reassembly time!

Monday, 23 November 2009

And the first coat of primer!

The first coat of paint was the yellowy etch primer, to chemically anchor onto the steel and give a good basis for further coats of primer.

The bare steel was given a blow over with the air line, then a wipe down with panel wipe. Once this had evaporated, a tack rag was wiped over every inch of the bare shell, to pick up and fibres or dust particles.

Clothes tucked in so they couldn’t drag across the wet paint. Sister attacks me with a plant sprayer, so my clothes and hair are damp and collect rather than shed dust. Floor dampened, but not too wet. Paint measured accurately, and mixed very carefully, mask on, compressor charged and shut down. I have run out of excuses. Apart from that Matt is due to turn up in a couple of hours so I can go and weld his Landy together. Oh well, better get on with it! Outside, I test the fan shape and density on a bit of scrap metal. A very minor adjustment and all is well. Back into the garage, time to paint the car!

I had never spray painted panels before, nor had I practiced, I just assumed I would be able to. Turns out I can. It’s a simple matter of getting the mixture right for the consistency and type of paint, then balancing speed and distance, and always keeping the correct angle from the surface being sprayed. A bit like welding really, just do it and don’t think about it.

I painted the nearside, topped up the gun, then did the offside. One litre of etch primer was just enough, thinned 50/50. The only issue was that by the time I got halfway through the second side, the paint fumes were affecting my judgment and in was entertaining to sit on the floor and grin a lot. Still, I managed it, and it turned out well even once I was a bit wasted. And yes, I am wearing the correct respiratory apparatus. Fairly expensive it is, too. Not very effective, oh well.


All is masked off and happy. You cannot begine to realise just how I felt at this sight, all one colour again, all smooth and beautiful. The extreme lamp can be seen on the left, the bonnet is in the right position with the front wings shifted foward.


Oh those composite wing tops. Oh yes. OH YES!


Painting is far more dynamic than I was expecting, especially in an enclosed space. It is a lot of fun, keeping the gun moving at the same rate can prove difficult in some areas, and in others keeping it at the correct angle and distance means rolling around on the floor, ducking, kneeling, diving and various other flexible moves.


The boot area has been given a dose of paint, after reshuffling of the masking.


I was a bit shocked with the end result. The whole car was a uniform colour. There was no orange peel, there were no runs. There were no faults in the paint. The etch primer, although just a primer, was smooth and glossy, I would have been exceedingly happy to take her out on the road just in that, even without sanding or polishing.


I am happy now.


That will do for a first attempt, I think.


Painting- the theory

“They” all said not to try and paint the topside myself. Certainly not the gloss coat. But what’s the point in doing all the metal work then chickening out of painting it? That would be taking someone else’s credit, as well.

I had decided even before starting that I would spray the car myself in the garage, and did not worry about it any more. I started planning many months before, as with anything on the car. Leaving the decisions until the time came meant further delays while stuff was sent for.
I had read and thoroughly enjoyed John Day’s series “A twin cam called Ratty”, a real craftsman restoration of a beautiful machine. Having seen the finished car in the flesh, I decided to adopt the same procedure and materials he detailed, as the deep gloss and period look of the paint finish was truly beautiful. Cellulose of course, none of this 2-pack tosh which gives a modern plasticy finish. Eurgh. Not to mention the difficulty of repairing and blending in paint chips, scratches and things, of which there will be plenty given the rough intended use this car will have.

A good a plan as any, if it worked for him, it should work for me. Hey ho, let’s go.
The rather fantastic paint company, called Nu-Agane, were contacted, and lots of stuff was purchased.

1 litre sand coloured etch primer, and 1 litre special thinners for this.
5 litres grey hi-build primer
15 litres standard thinners, for thinning the primer and cleaning the gun and other things.
5 litres of high gloss Glacier white top coat. Wooot!
5 litres high gloss, anti-bloom pure virgin cellulose thinners, for thinning the top coats.
1 litre of panel wipe
A lot of tack rags
A huge stack of paint filters
An even huger stack of mixing cups

And this lot came to about £320. A lot? Erm NO!

How much would it cost to get someone else to pay you car? Not only that, I was more than happy with this price. The quality and standards of these products was absolutely superb. The service from the company was of a standard rarely found these days, with friendly and knowledgeable advice which was of real help while determining the order.

The next consideration was how to apply the paint to the panels. I particular, the compressor, spray gun and air line and filter set up. This is of vital importance to give good results. A cheap, naff spray gun, or a set up with allows water to condense in the air line will give an abysmal finish that looks home-done. Like this particular car used to have.

I bought a Clarke SP14C spray gun. What a good decision that turned out to be. It was fairly cheap, it is very well balanced full or near empty. They quality is superior to anything else at the price, and it is easy to clean. It is also just about the only spray gun that will fit my stupid hoooge hands. All in all, it’s ideal and used correctly will do the same job as something costing £200, which I do not have at the moment.


At the risk of sounding a little strange, I adore this gun, it is superb and reliable and effective. Machine Mart do sell some good stuff, in time you end up being able to tell the difference between good and bad.


The compressor was not an issue, I borrowed one. At 2.5 horse power, the motor and compressor were up to the job, but it had a small tank for the power output, I was very worried with how it would keep up especially on the larger panels. No need to worry though, I never had to slow down or pause to let the air supply catch up, it worked out ideally.

Getting air from the chuggy whirry thing to the hissy thing was the next issue. Everyone puts a filter on the compressor, then fails to admit one from the back of the gun. DURRRR! Basic science here folks!

Air gets hot when it is compressed. When it leaves the tank, the water and oil from the tank is filtered out by your tank-mounted filter. But as the air travels from the air line to the gun, it cools down. The water condenses out. The water gets into the paint, and gives a shoddy finish. Even if all looks well, when you get the car out into the sunlight for the first time, the water heats up, and leaves the paint, cracking it or making blisters and craters.

The answer to this problem is cheap and simple. Fit a small in-line filter between the air line and spray gun. And regularly check and empty it while spraying, it will improve things so much. Please go and do it, please.

I went for a filter-regulator on the compressor, a decent 15m length of rubber air hose, both to reach both sides of the car, and to allow as much water to condense out, before it arrived at the next item, a small inline filter just before the spray gun. Simple, and worked perfectly.
Right, one last area of decision making. The garage, having been home to major bodywork for over 9 months, had thick layers of grinding dust all over it. This had collected everywhere, over everything and was 1/16” deep. It had even got into the loft. So how to turn this into a sterile environment for spraying? Firstly get it as clean as possible. Perfect timing, a windy day. Open the back door of the garage. Open the big front door. Air blow gun… compressor… good, no one is watching. Blow the dust up, then out of the garage. Great, it’s someone else’s problem. The process was repeated until less and less dust settled after each time.

Still nowhere near clean enough for painting. There should be no dust, no loose particles, no fibres, nothing. The garage floor was plain concrete, I had considered sealing and painting it before starting to strip the car, way way back months before. ( A LOT of thought went into every stage of this project!) but it would have cost a bit, and I hardly had any money. So I decided to thoroughly clean the garage ceiling, shift everything over to one side of the garage (The side with the opening to the loft, still a big dust trap) and make a room within the garage. The spray booth.

Three packs of thin, translucent polythene dust sheets did the job. Three 9’ x 12’ sheets in each pack. These were pinned to the ceiling, each pin going through a duct tape patch to spread the load and avoid tearing. The sheets made up a room around the bodyshell, as large as the garage would allow to give me adequate working space around the car, vital when spraying. The sheets were taped together where they met, and weighted at the bottom with large smooth rocks from a pile in the garden, each one cleaned first (this kind of attention to detail is vital). The garage door had to be opened slightly for more room to spray around the back of the car, and to let a bit more light in. This meant that the slightest breath of wind would flap the entire spray booth terrifyingly, but it held together. Ripping it was another pain, but it was very successful. The sheeting covered the floor, and up to the underside of the car, any of the underside paint showing was masked off. The interior of the car was masked off as well, however a cunning system meant I would be able to open the tailgate and get some paint in the boot area without disturbing the masking. Access to the fridge and freezer in the garage had to remain, so more thought was required, but in the end I had a dust proof enclosure, masking off absolutely everything except car body panels which were to receive paint. Apparently it was of some interest in the local area as to whether I was going to try and paint the car myself, this was confirmed by me with the garage door open rigging up the dust sheets at gone half two, one night!

Lighting had to be considered, with side lighting as important as overhead lighting. The fluorescent tubes in the garage were joined by several cunningly placed inspection lights, and Nige’s huge floodlamp on a tripod was positioned prior to painting an area. Well thought out lighting is highly necessary, otherwise you cannot see how much paint you are putting down.
I had decided to temporarily fit the doors and front wings, for painting. This was a huge mistake, as we shall see later. I was keen to ensure that where the scuttle joins the front wing, both the entire scuttle and wing were painted, otherwise bits would be missed at the join. (They would still be in primer, just not as much). For that reason, the wings were temporarily fitted but too far forward, bolted on using the next hole along on the inner wings to keep them forward of the scuttle. This meant all of the surfaces got paint, and the wings were done at the same time as everything else.

All set, then.

Saturday, 14 November 2009

Well it has been quite a long time since I have written anything here, most posts were written about a couple of weeks retrospectively. But things got hectic, I am now writing about events which happened half a year ago..!

While I was painting the underside, I realised I had to get a move on, so I could get her finished and actually use her a bit before going off to University. And so began the long days and night shifts, getting up around 9am and working on the car until about 3am the next day. Then grabbing a few hours sleep and getting back out into the garage!

With the underside painted and ready for the worst the British (and hopefully foreign) roads could throw at it. So she was rotated upright, and lowered back to the floor so the final metal mashing could take place, then she would be ready for paint and reassembly.

I am not going to say much about the panel fitting, and getting the doors adjusted properly. It is a boring process, a great deal of hard work so it’s best to just get on with it. It is equally irritating when the bodyshell is SO close to completion, and so close to looking good, with the underside finished. So nearly there, but so much yet to do…. It was always going to be especially difficult, I had replaced the rear wings, B posts, outer sills, reskinned one door and bought another which had been reskinned to replace the one which got mangled. But the front wings needed sorting first before I could start aligning things.


Oh joy. The wings to be used were 1980 rubber bumper wings. Rotten 1980 rubber bumper wings. I’m not going into too much detail of the hellish process of firstly making them sound, then converting them to chrome bumper wings such that it is impossible to tell them apart. Let’s just say it was frustrating, took a couple of weeks of solid wing work and I ended up making and replacing a headlamp ring, many sections needed cutting out, new repair panels made and welding into place then leading, plus panel beating new sidelight apertures. Then there was the not-so-simple matter of making the wings fit the scuttle and replacing the beading at the top. Each front wing was tailored to each car in this area at the factory, and I ended up completely replacing most of the top rear corner to fit the scuttle and replaced the heavily corroded steel at this point. Hopefully, once I had applied a thin layer of lead to the complicated beading area with several layers of metal, it should last for many years without rusting, we shall see.


This is the better of the two rubber bumper wings that I was to be using. Here I have began to convert the wing to a chrome bumper type, panelbeating a new section to weld in, then cutting a hole in the right place for the sidelight unit. A new piece is required in the top right of the picture, one of the many areas which had rotton (examples in this picture- headlight ring, and the front of the wheelarch). Any rotten and thinned metal was cut out, and repair pieces fabricated and welded in. Much panelbeating.


Then the door and wing fitting began on both sides, getting the door in the right place both horizontally, vertically and sideways in relation to the other panels. Again, the less said about this process the better, patience is required but a good, even door gap is the result.


The wing, looking much better now, after the corroded areas replaced and lead loading as required. The areas most prone to corrosion were painted in the red Bondaprimer, for a bit more protection. The underside of the front wings have yet to be painted in Jotun white, the glorious stuff used on the underside. The result of the first of two VERY long nights of seam sealing the engine bay and bulkhead can be seen.


Starting to fit up the wings and doors, a very, very long process. The interior has been primed in Bondaprimer, while the boot area will be sprayed white, very little of the interior will be top coated, to save money, it cannot be seen anyway. The transmission tunnel and centre console will be done though, as this can be seen where the carpets join.
Hang on.. That’s the bodywork done. However, as I was removing the doors again so I could start cleaning the outer panels back to bare metal, I noticed that the replacement door I had bought was a 3-sync 1960s door. Oops. Thankfully it did not take long to cut the differing areas out of my old door frame and seam them into place on the new one. Ahh, a 4-Sync door. With the windscreen winder mechanism recesses and interior door handle in the correct place. Wonderful.

Whilst fitting the doors, Richard mentioned that Meg's door skins were suffering from the cracking at the quarterlight. Strange, this is very common with roadsters, it's due to the pressure put on the quarterlight from the hood when the door is closed. I have never heard of it happening on a GT before though. Still, I decided it was not worth the risk of fitting new door skins, painting them and having them split. That would be quite annoying. So I welded plates inside the door at the stress point, to spread the load out into the door skin.
Holes were drilled in the door skins at the pressure point, and a piece of steel was cut and formed to fit snugly up against the area from inside. The Cleeco welding clamps came in useful yet again, while plug welding the plate to the door skin. The welds were ground down, and all was well. It was extra hassle, but worth it for the peace of mind. Of course both parts were prepared in weld-through primer, then the plate was seam-sealed afterwards to prevent corrosion.

Scrubbing of the outer panels began, with wire brushes in the drill to remove flash rust, dirt and such. She looked lovely in completely bare metal. Wonderful.


A spring day, late evening sun, and shiny metal.


Steel is beautiful! The headlamp ring, now repaired and leaded, has been painted in Jotun 2-pack so it is invincible, the cellulose paint can just sit on top.

Finally, after 21 kgs of MIG welding wire, 9,200 litres of shielding gas, and probably half my bodyweight in angle grinders, electric drills, discs and wire brushes (I might actually work it out!) the metalwork was done. Oh yes. It has been extremely enjoyable, I can’t think why I love the part of the restoration which everyone else hates.


Clearing out the accumulated junk in the garage happens regularly. These are just a few of the wire brushes used, most went in the bin but as some wore out I chucked them aside, got a new one and carried on. These are just the ones which missed the bin!
Also of note is one of my shoes. Rather burnt and melted. I tried welding wearing hefty safety boots, however when a molten blob of melt burns through clothes and down into the boots, they take ages to remove which it painful. I much prefer my loose, burnt shoes and old socks, so when it rains white hot metal I can shake it straight out.
Right, onto the paint. Summer is nearly here!


Saturday, 23 May 2009

Painty!

Applying stuff to the steel underneath! Yes at long last, she’s ready to be painted underneath, and the paint system and protection technique had been troubling me since before I bought the car in the first place. And after a huge amount of research, discussing the subject with many people, I ended up doing something which I am now fairly happy with.

Nothing which is usually done made me happy, yet I could not come up with anything better. Without going into very much detail as I don’t want to bore everyone, here are the brief outlines of my findings.

Disadvantages of common underside systems.

Underseal: There are two main types of this. The stuff which sets hard-ish, and the stuff which stays sticky. Both are absolutely awful to remove from a car, trust me. So once you have a newly-repaired underside, there was no way I was going to cover it in ming again. Also, you cannot see what is going on. It’s all hidden under dreadful black stuff, how do you know the spot welds holding the chassis rails on aren’t rotting out? The sticky stuff is not easy to keep clean either. And the stuff which sets is worse than useless. As I have seen time and again on many cars, It traps water underneath and accelerates corrosion. As I found out and mentioned much earlier on when I was removing underseal, there are areas which ad been wrecked by the underseal, water collecting underneath it rotted the old footwell/floor pan/transmission tunnel area. Also, repairs from about 5 years previously, “”protected”” by paint and underseal, had fared worse in many cases than the original 1972 metal.

Stonechip: The older sorts of stonechip trap water underneath them. Like underseal, they were (and some types still are) a liability. The idea is to have a flexible layer of stonechip, with paint over the top. Hang on, how does this work, a tough layer of paint floating on a flexible surface? Surely this needs very flexible paint to be effective. Again, it hides what is actually protection the steel.

Paint: Just paint underneath? Hmmm, an effective primer then tough 2-Pack over the top might almost work, maybe for the types that only bring their cars out on dry days for a trundle around the local villages. It just doesn’t have the toughness to withstand a battering from stones, while it might just about work for some people’s cars, it won’t work on mine, which will get used and ragged.

Oh and underwing shields: Do I even need to mention these? Well suppliers keep listing them, so I presume people are still buying them? Well yes, they protect the paint from stones. But you are also creating a double thickness inside your wheel arch, and the accumulated muck and water is going to accelerate corrosion like nothing else apart from driving up Bristol channel every day.


A couple of the most important things learnt were that the flexibility of paint used underneath is not of paramount importance. Yes body shells do flex (A lot more than you’d ever imagine) however the amount of movement in a given area is far less than the upper limit of flexibility of most paints. In other words, the steel flexes very slightly, most paints flex a lot more.
The other thing is where exactly corrosion starts. Yes, if the coating chips of flat panels, they will start to rust. However, about 85-90% of corrosion on these cars starts off at the joins. Yes, those double thicknesses of any sorts, where two panels are spot welded together and moisture gets in the flange. This is where rusting starts. And once it has eaten away the flange, it starts out dissolving the panel. And it happens faster underneath as this is where most salt and water is, although of course anywhere where air can get to will rust as well, so nowhere is safe on a body shell. So the flanges underneath are the most prone to corroding and are the biggest hazard. This is where seam sealing plays an important part.
Then came some interesting correspondence with Robin Gell, who was having the similar thoughts about how to protect the underside of his Factory V8. And I do believe he has hit on it. I was a bit apprehensive about “copying” someone in this way, in case it seemed I was following something unproven or taking someone’s word without giving it enough thought. But no, after hours of blahhing on about paints with various classic car restorers, those in the trade, and plenty of sleepless nights, I decided this was the way to go. More than worth a try, it seems far better than anything commonly used.

Over bare steel, it works as follows:

Bondaprimer. This is zinc-resin primer, which apart from getting to your head very quickly, is a fantastic primer for steel. The resin formula means the adhesion to steel is excellent, indeed trial pieces left to harden for long enough showed impressive resistance to battering with hard pointy things. High zinc content means corrosion resistance is extremely good, I have been shown steel fabrications made over 20 years ago which have been treated with BondaPrimer and kept outside, and when I was given permission to remove small areas for inspection of the steel (as long as I repainted said areas myself!) the metal looked fresh like it had only just been overpainted, on flat areas and over joints as well. This stuff has been used by a local garage for many years to good effect. It seems the best primer for underneath, it is very easily applied by brush and while it does not have as high a zinc content as the Electrox I used in the box sections, then smooth finish and similar corrosion resistance make it ideal.

Jotun HF Marine 2-part gloss: This is a real test as to whether Stephen actually reads this, if so he will make a lame quip about MGBs handling like boats. Paint designed for use on the superstructure of boats, the resistance to road salt should be good then! It is highly resistant to water, a very tough 2-pack which looks good even when brushed on, and will protect the primer from damage as well as giving the underside the correct colour as it can be had in a large number of colours, one of which will be near enough for the underside. Testing on scrap steel, over Bonda primer, again shows great adhesion and chip resistance, I am confident that this very high quality paint will last a very long time.

Plasti-Dip Soft Coat: This is going on over the top. To act as a sort of underseal, but not quite. While the Jotun HF is very tough paint, it still really needs another coating over it to protect from damage by stones. I would be very unhappy just having the paint underneath, it needs something to protect it. Plasti-Dip is a solvent based rubber, which can be applied by brush. It dries quickly so layers can be built up to give a thick coating in the areas which need impact resistance. The best part is that clear Plasti Dip can be bought, which means the white painted underside will still be visible, the condition of the paint can very easily be monitored incase any area are starting to corrode, and the condition of the Plasti-Dip layer is very obvious so it can be recoated easily if any areas suffer worse than others. All in all this layer will protect the paints without looking awful or hiding the condition of the underside.
Ok then, enough wordy stuff, loooooook!


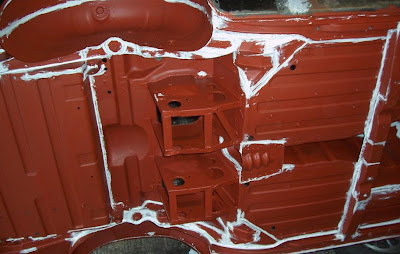
The first coat of Bondaprimer drying. To coat the underside is a lot of work, I started about 8pm and was out there until half two. Blarrrgh those zinc fumes! What a relief to have everything protected from flash rust, and looking rather nice if I say so myself.


Seam sealing! The next important stage. And I know it looks a mess, but it's all smoothed and blended in. The trick is to dip your finger in white spirit so the seam sealer does not stick, then it can be spread and smoothed easily. Everything was sealed underneath, to block up any microscopic pores in my seam welds, and to seal the few remaining original spot welded flanges. No air or water is getting to the metal now!

More seam sealer, and a bit more to do. I spent a lot of time and attention to detail doing this, bearing in mind the yearly floods around here sh will have to cope with.

And then it was all covered in the second coat of BondaPrimer. I'm glad I diddn't spend ages grinding down all the plug welds, it would have made little difference really. And yes, after all, this is the underside!


I am confident this stuff will protect my new floors, sills, crossmember, chassis rails..... Spare ROStyle holding things up! Lovely thin well spreading primer, it gets into gaps very well.


And the first coat of 2-pack! Does that make you MOIST? Yes I'm glad I've saved that (admittedly innapropriate) word until now, it's the only one to describe the smooth, glossy, pale white underside. The Jotun HF is a joy to use, creamy and easily brushed on in a thick enough layer. Rememeber this is one coat of gloss white over deep red! I have to admit, brushing the white over dark red, I can see the attraction of the Works MGBs. However, I would have a darker red with the white if I ever make a works-ish car!


With the second coat of Jotun HF on, she's now looking like she's worth something. No longer lots of panels melted together by a mad man with a MIG, but a proper bodyshell which will soon become a car!


And there she is after the first coat of Plasti-Dip. It is very painful applying this matt-finish rubber over the beautiful gloss. Most depressing. Arghhhh! But even so, it still looks rather fetching. That is one thin coat over the entire thing, just for some added protection. Then the real impact resistance treatment started. Anywhere most at risk of flying stones (and this took a lot of thought and planning!) got many more coats of Plasti-dip layerd up to build a thick layer. The front inner wings, footwell ends, fronts of the sills, chassis rails, fronts of the floorpans, front face of the crossmember, the rear wheel arches, the rear valance were the main areas for serious protection. When I have finished the metalwork mess that is the front wings, their undersides will get the same paint and Plasti-Dip treatment.


It's impossible to see, but there is about 1/8th inch of clear rubber over this lot. I am fairly happy this will give the impact resistance required, I would like more everywhere but literally cannot afford any more of the stuff. I shall see how it fares after hard use on a few road trips, and maybe apply more over the winter if required.


Oh, I will have to do the bits underneath the spit brackets later of course...!
I am very pleased with how it has turned out. Very pretty and very solid, if you hit the panels they now don't really go clong. That's the Plasti-Dip taking up the impact!

Wednesday, 20 May 2009

Just in time, the new rear panel turned up. Admittedly just a rear valance would normally have done, but someone had replaced the valence in the past so everything was a complete mess and it seemed more logical to replace the rear panel whole. This consists of the valance and the area between the rear wings below the tailgate.

That morning I had drilled out the spot welds that held the rear panel to the rear wings, and cut off the old valance. I had cleaned and primed all the remaining flanges, and adjusted and repaired the flanges on the ends of the rear chassis rails. Holes had also been drilled in the rear of the boot floor for plug welding to the new valance, so all was ready.


Yip-Yay. Fully repaired inner and outer rear wings, leaded at the top. The rear panel has been removed, it's obvious what it welds onto. My new rear axle has just arrived as well, note it's made a huge puddle of oil all over the floor already, so it's a good'un. Actually it's nearly new, to replace my old one which shredded itself. And the car too, nearly.


The panel turned up and it was quickly unwrapped and the Heritage paint removed and the edges primed. A bit of tweaking and fitting and it was possible to slot it into place, a bit of a fiddle because it goes behind the rear wings sandwiched between wing and boot floor extension.


There it is in place, all new and lovely. The interior still looks an awful mess with the flash rust etc, although it won't be long now....


Weldy time, most of it was attached apart from the seam welds between valance and wing which I decided to do once the car was mounted on the spit again for painting. Final grinding of the welds, will take place later, as more work was required making the small panels which fit underneath the light cluster.


Now the rear panel was on, she was starting to look very car-like again. Some lead loading would be required, to make the joins between rear wing and rear panel seamless (some cars had a visible vertical line at the join each side, some had them filled in, including mine) and over the rear wing/valance join, which also needed to be seamless. This was also to be done when the car was on the spit, as it is a lot easier lead loading on a horizontal surface than a vertical one!


This is the rear wing to rear valance join. It has a small overlap which would have been spot welded originally, but I have seamed from the outside, flipped her over, and seamed rom the inside. Smoothed down, it's time for some lead. Nothe the area under the rear light cluster still needs more work, this will be done later as the spit brackets get right in the way.


Solder paint....


And some lead. After all the practice, I can use the minimum of lead to get the right shape, meaning less has to be filed away. Filing then sanding will still be required of course.


In the evening, with the rear end now as solid as it had ever been, she was hoiked up and put on the spit again. Careful placement of the spare wheel and a couple of blocks of wood meant I could tip her over 90 degrees from horizontal and rest the top of the A post on the wheel and blocks to keep the shell from rotating any further. It was then easy to roll the shell up to horizontal again, kick the spare wheel over the other side, walk around the car holding it steady all the time, then lowering it down on the other side. Thus in less than a minute I could single handedly roll the whole lot one way or another, resting on whichever A post was downwards. This was safe and sturdy enough, there is not a great deal of force exerted on the A post and indeed the shell could be lifted up and over easily and comfortably. If shoving, hammering or other such violent activity was to take place, the locking bracket provided with the spit could be bolted on for added safety.


The spit proved its worth over and over again. Firstly there were the last repairs to make to the rear chassis rails, and the rear axle check strap mounts to weld in place. The plate at the back of the transmission tunnel between the floors had been removed so I could chisel off some of the layers of rust, and now I could weld it back on then cut off the temporary spacer I had welded beside it to remove the possibility of anything shifting. Final welding of castle rails to floor and rear spring hangers took place. More grinding, then the removal of underseal, paint and rust from the rear battery boxes, which was a lot of work. Deeming it a waste of time trying to get the battery boxes perfect, due to their intricacies and difficult corners, I removed as much rust as possibly then used Rustbuster’s rust converter, and when dried I removed any excess from clean steel. The rust converter chemically anchors to any remaining surface rust, stops further corrosion taking place and can then be overpainted. It is very effective over rust, and grips very well.


The entire underside was now bare metal, apart from small areas in etch primer which would do no harm. I went over the whole thing with various types of wire brushes and poly wheels in the drill, followed by a going over with a coarse twist knot brush in the grinder to give a slightly less-than-smooth surface for the paint to key into. Ready for paint underneath, at flipping last.


Oh yes. I wish I had had the time to get some better photos of the bare metal underside, however time is not for wasting at this stage.


Looking almost liquid.... Everything seen here is my work, apart from most of the transmission tunnel.


All work listed above was immensely easy once I had the car on the spit. It must have been turned over a lot more than 100 times while finishing off underneath, so I could weld or grind from above, or get into difficult areas far more easily with the drill and brush. And if it was useful then, it was to prove a blessing during painting the underside.